Poker Chips Set Up Guide
Loading Options
The QR code shown on the front serves as the public key. To access the private key, simply peel off the hologram and flip the QR code to reveal it.
Peeling off the hologram sticker grants access to the QR code, revealing the public key. The private key is located on the reverse side of the QR code. To access the funds, individuals must peel off the hologram and flip it. Any attempt to tamper with the hologram will leave behind a residue, serving as evidence of tampering.
There are two methods available for loading your poker chips, depending on the quantity required. For smaller quantities, the simplest method involves manual loading. To manually load chips, you can scan the code and transfer them to the designated wallet address.
Alternatively, for loading larger quantities, follow the instructions provided below for the second method.
Setup and Installation
- Before you begin loading your poker chips, you’ll need to download and install Bitcoin Core. Once the software is installed, start syncing your Bitcoin node. Keep in mind that the syncing process may take varying amounts of time depending on your internet connection and hardware.
- Elements a client that allows you to interact with the Liquid Network. Download Elements, and begin syncing a Liquid node. You can refer to the setup guide provided by Blockstream here. Keep in mind that this process may take some time, depending on your internet connection and hardware.
- Specter Desktop is a desktop wallet interface compatible with both Bitcoin Core and the Liquid Network, developed by Specter Solutions. In collaboration with Specter Solutions, we have developed a custom plugin that can be installed within the interface used to load the chips.
Setting up Specter Desktop with Bitcoin Core and Elements
Once you have installed Specter Desktop, launch the application. You will then be prompted to configure your Bitcoin and Liquid Nodes. You will need to configure the nodes according to where they are located on your drive. For any concerns relating to troubleshooting, please refer to the Specter guide in the link provided below.
Once your nodes have been configured with Specter, you are then able to make a new Liquid wallet within Specter Desktop or import an existing one.
Exfund Service – Specter Desktop Plugin
Within Specter Desktop, on the left hand sidebar, you will find the option to choose and add additional plugins. Select and install the ‘Exfund Service’ plugin with the Excellion Lion icon.

Once you have done all of the above, you can begin loading the chips. In the provided file, the documents containing the addresses are categorized by the color names that correspond to the chips they represent.
Chips are primarily sold in sets of 25, hence why this plugin was developed to load up to 25 chips at a time. Therefore it is recommended that they are loaded all at once, in batches separated by color/denomination. In order to individually load them, you will need to distinguish the chips by reading the shortened address printed below the code, or by scanning the code using Blockstream Explorer. In essence, they are paper wallets, so they can be loaded remotely without the physical chip present.
Loading the Chips
Make sure that you have sent the necessary amount of USDt to the wallet that will be used to load the chips along with a small amount of Liquid Bitcoin to cover network fees (2-3 USD worth will suffice). Once your wallet has been loaded, select the installed Exfund Service Plugin.
1. You will be prompted to paste the receiving addresses or drag & drop a CSV file with the appropriate codes.
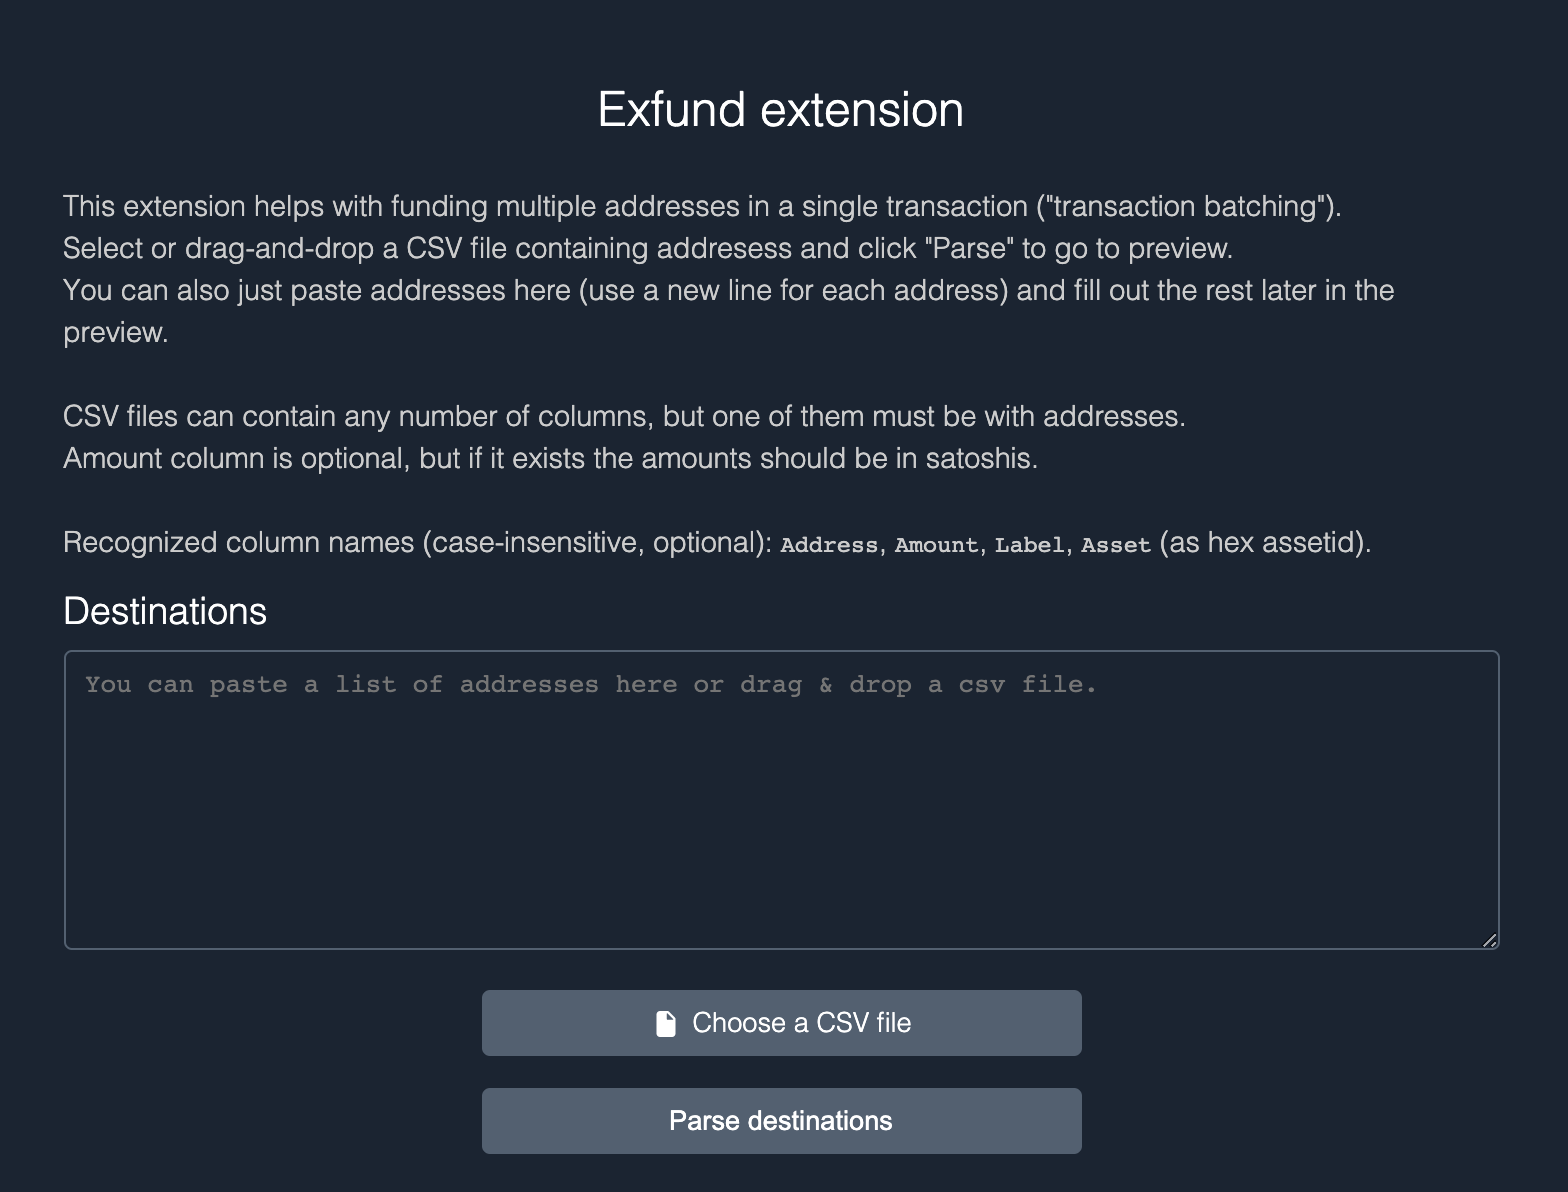
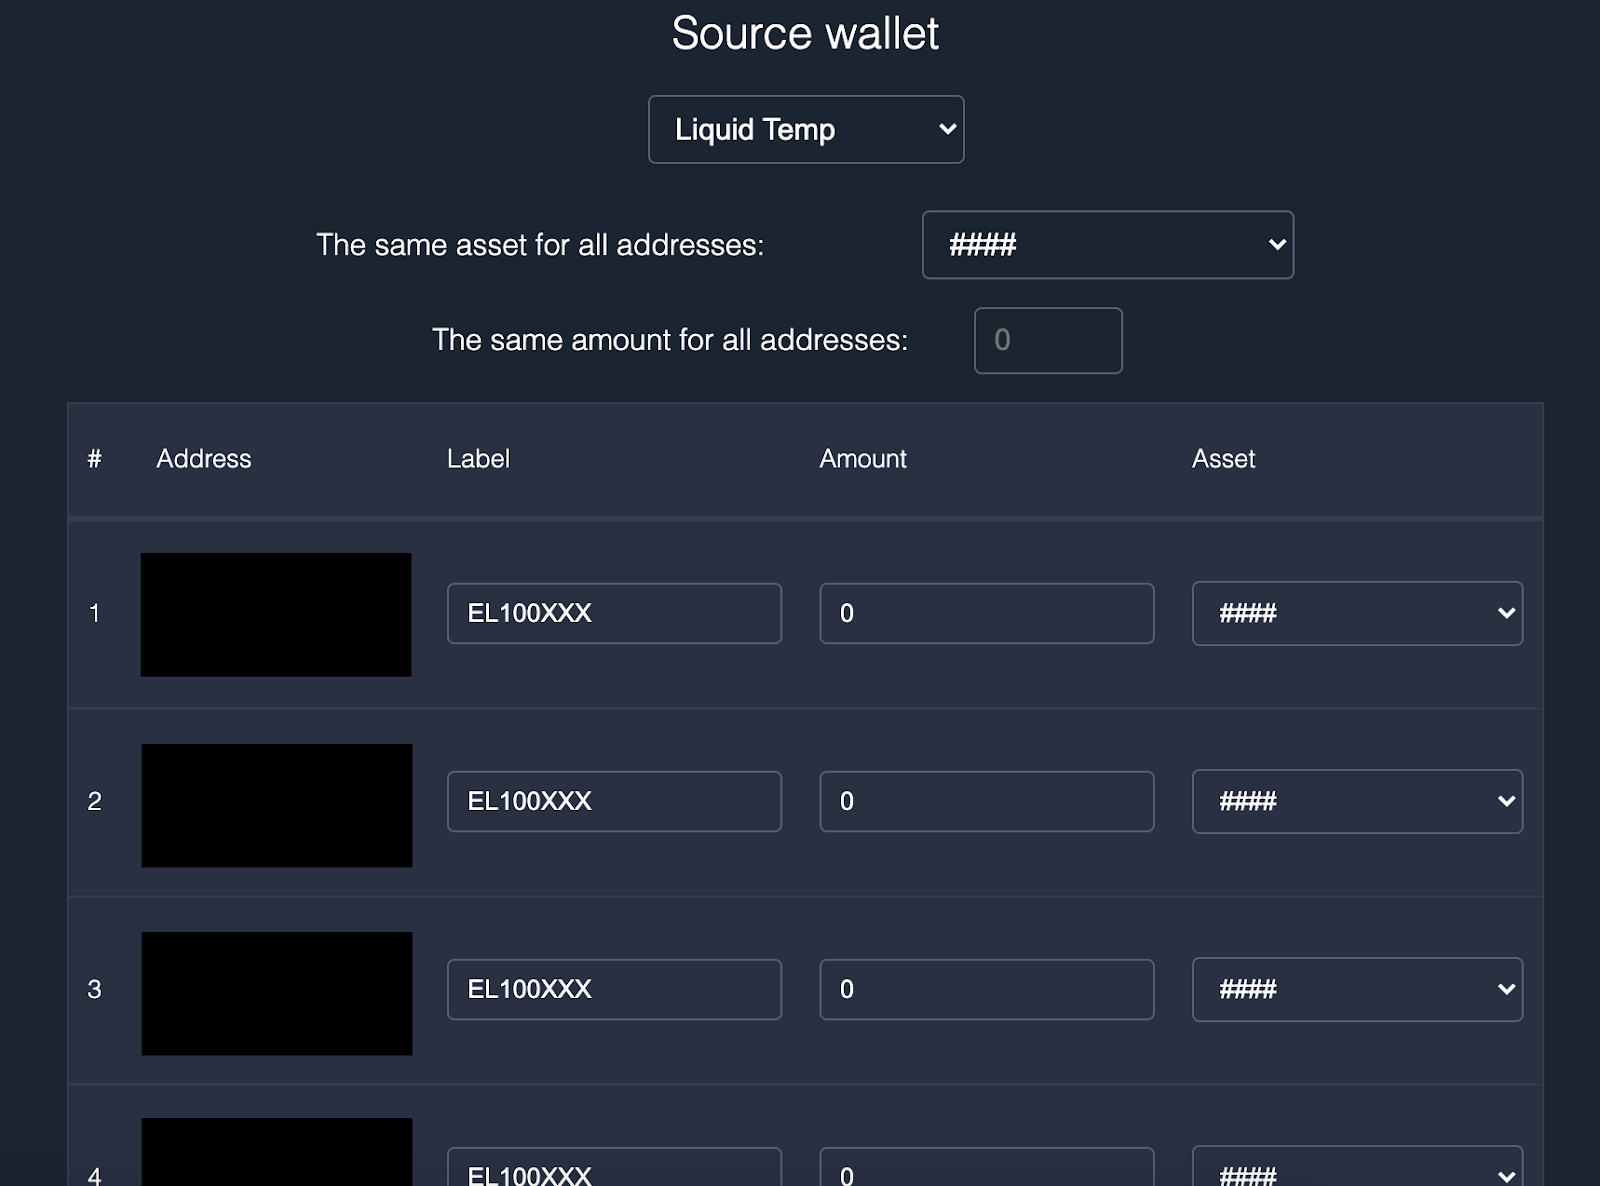
2. Once all of the destinations have been parsed into Exfund, you will need to select:
- The Liquid wallet you wish to draw funds from
- The asset type (In this case, USDt)
- Amount to be sent to each address (‘same amount’ field or manually entered if different amounts)
- It is recommended that you only load the chips with the same denominations together. Otherwise, you will need to manually enter the amount for each chip depending on the denomination.
A quick note regarding the serials for the chips. You will notice that the first number of the corresponding serial numbers may be different. If the serial starts with:
1 = White Chips = $1 Denomination
2 = Red Chips = $5 Denomination
3 = Blue Chips = $10 Denomination
4 = Green Chips = $25 Denomination
5 = Black Chips = $100 Denomination
6 = Purple Chips = $500 Denomination
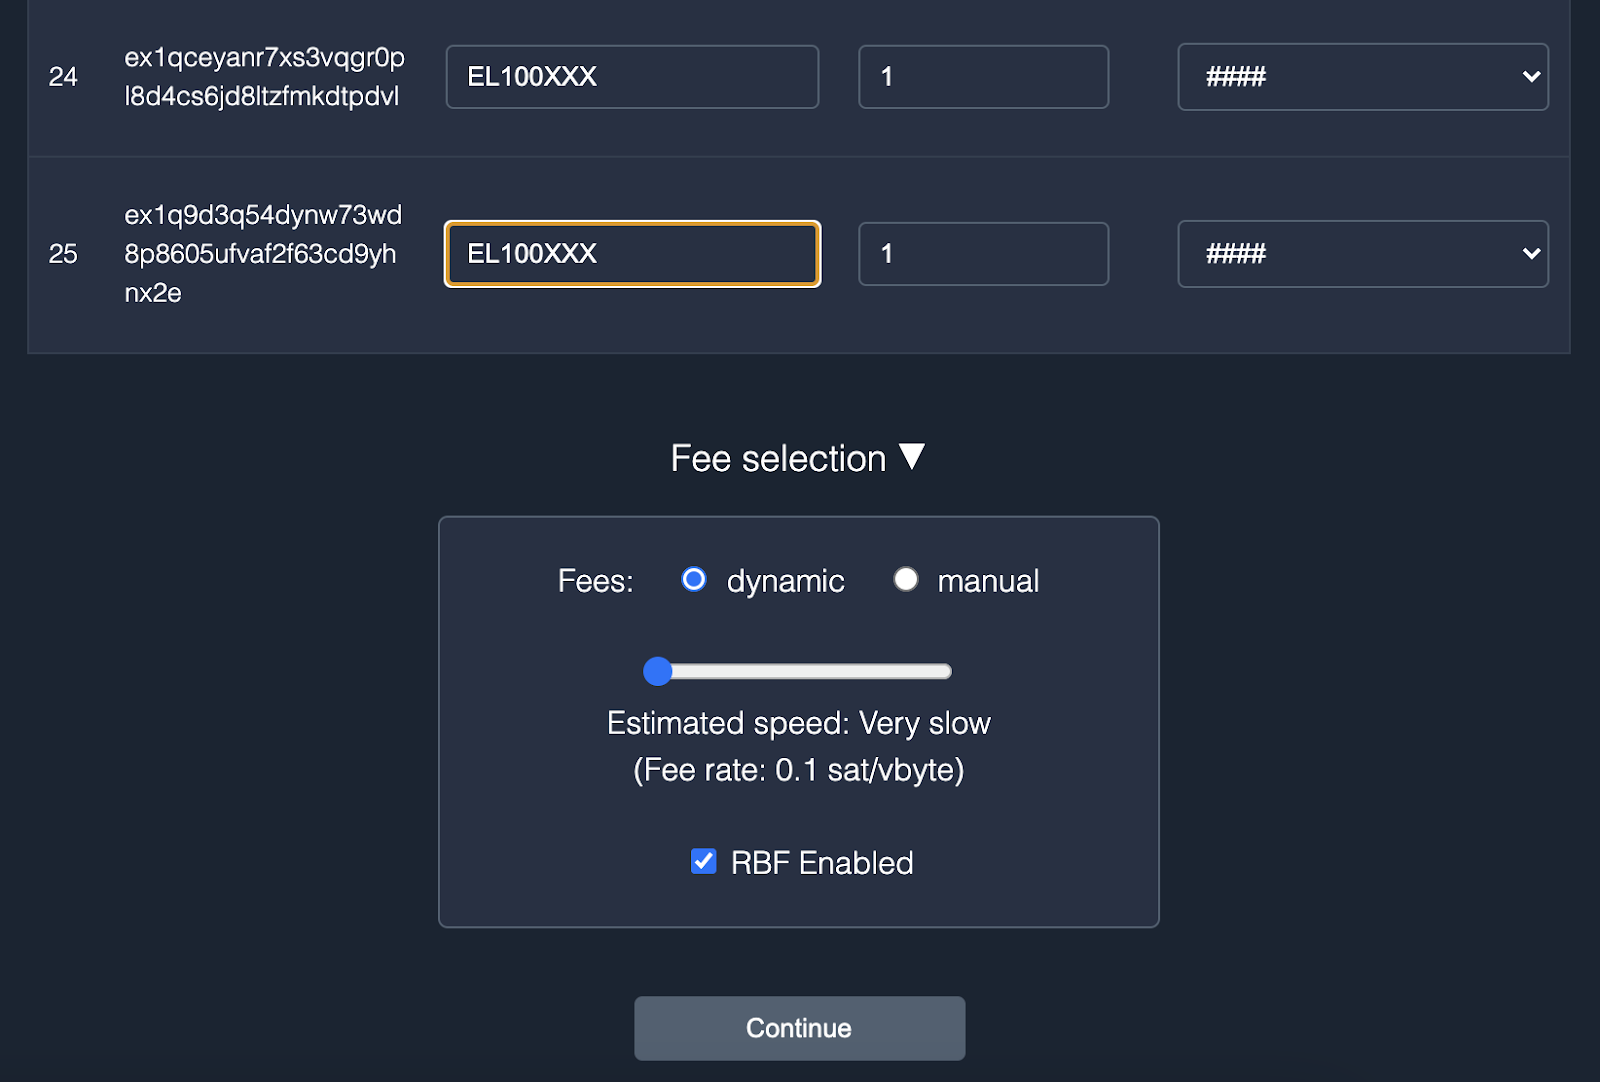
3. Scroll to the very bottom and configure your network fee preference then press ‘Continue’. At this point, the funds will be sent to the provided addresses. You can confirm this by checking your Liquid wallet in Specter Desktop and checking the ‘Transaction Tab’ or by pasting the receiving address into Blockstream Explorer.
- Note that if the transaction is not processing correctly, you may need to go into your Liquid wallet within Specter Desktop and sign for the transactions under the ‘Send’ tab.
How to obtain Liquid Assets
You can convert your Bitcoin and USDt from other chains to Liquid using any of the following resources:


